• Welcome to Jetboaters.net!

    We are delighted you have found your way to the best Jet Boaters Forum on the internet! Please consider Signing Up so that you can enjoy all the features and offers on the forum. We have members with boats from all the major manufacturers including Yamaha, Seadoo, Scarab and Chaparral. We don't email you SPAM, and the site is totally non-commercial. So what's to lose? IT IS FREE!

    Membership allows you to ask questions (no matter how mundane), meet up with other jet boaters, see full images (not just thumbnails), browse the member map and qualifies you for members only discounts offered by vendors who run specials for our members only! (It also gets rid of this banner!)

    free hit counter

Bilge Pump Running while at anchor

gspersi

Member
Messages
5
Reaction score
0
Points
10
Boat Make
Yamaha
Year
2022
Boat Model
FSH Sport
Boat Length
21
I just bought a 2022 Yamaha 210 FSH Sport. So far every time we are at anchor the bilge pump comes on about every thirty minutes and seems to pump at least a gallon if not two. I open the engine compartment and cannot see water actively flowing in from anywhere. Where could this much water be coming from?
 
Any through hull fitting. Next time your out pull the cleanout inspection cover and check for incoming leaks. It’s a very slow leak if it’s only coming on every 30 min so it may be hard to pinpoint. The other way is while it’s on the trailer is to put water in the bilge and see where it leaks out.
 
I just bought a 2022 Yamaha 210 FSH Sport. So far every time we are at anchor the bilge pump comes on about every thirty minutes and seems to pump at least a gallon if not two. I open the engine compartment and cannot see water actively flowing in from anywhere. Where could this much water be coming from?
Congratulations 🎉🍾 on the purchase! You’ve bought a great boat and I think you will find it as enjoyable of a boat as I have!

So there’s a few areas where water can be coming in at on your boat. The good news is with some time and a little effort you can achieve a dry bilge.

First, carefully inspect the O ring on the drain plug, as @Babin Farms eluded to, having the boat on the trailer with plug in and add water to the bilge is a great to check for leaks. Pull the bilge pump automatic fuse which is next to the batteries before you start this process so you can add enough water to fully cover the bilge pump without it coming on to increase the head pressure inside the bilge. Spray the plug O ring with silicone spray as well as the female threads to keep things easy to install and remove.

Next, I’m going to assume you’ve had your live well full? If you keep the live well full the boat will list to port.

-If so there’s a couple of places where water can leak from the live well. There is an aerator on your live well, it picks up air from the little black circle with MAX AIR written on it, above the live well on the transom, there is a small black hose that runs from there down to a nipple on the aerator suction side fitting, that’s the one with the microfiche filter screen. I’ve seen a few 210 FSH owners finding the little black hose not connected to this little nipple, and when the live well is full a small but constant flow of water is draining into the bilge. You can pull the transom mounted cup holder on the starboard side and reach down in there to check that it’s connected.

-The next thing to check is the tightness of all the fittings on the live well. You’ll have to pull the clean out tray gain access to a couple of them although you’ll be able to reach the aerator fittings from the aforementioned cup holder. The others will require a certain level of boat yoga to get to from the clean out tray area. These are plastic fittings so just snug on them or you can strip the threads. While the clean out tray is off you can check the live well fill pump and it’s hoses as well as all the other clamps and such for tightness and corrosion.

-The aft bilge area also gives you access to the deck drain scupper and the live well drain scupper, when you’re on the water use a bright light and reach down there to check for leaks around the scuppers and the associated hoses. These scuppers are plastic from the factory and should be changed out with stainless steel fittings.

Check this thread I did on the OEM scupper


Also

Once you’re done in the aft bilge spray this area down with silicone spray to prevent corrosion and it makes it look nice.

Next will be the anchor locker drain. Once our boats this drain is barely above the water line, if anyone is sitting up front it will be under water, and if the one on your boat is anything like mine it will be bringing water into the bilge. @drewkaree did a great thread on this and the link below picks up with my contributions to that thread. Be sure and get the little stopper to keep water out of the anchor locker once you’ve replaced the crappy OEM thru hull.


Other areas of water intrusion

Back to the clean out tray…. This needs to be sealed after it’s installed, don’t glue it down. You may find that the OEM screws are stripped so get some larger screws and put them in, just snug. I also eliminated the clean out tray drain as our boats have a channel on either side of the clean out tray, and that drain can allow water to shoot up into that area if you stop fast, I got the block off fittings from marine east, this eliminates another possible leak area and it makes it easier to get the clean out tray off and on. Next, you’ll want to get a mechanical hatch riser from Jet Boat Pilot.

Clean out plugs;
I’d also suggest putting clean out plug seal replacement kits on your plugs, then get a few sets of O rings from @Spooky pantz.

Check out this thread. This find by @TeeNGee deserves the Nobel peace prize! This will eliminate water coming up from the clean out plugs and onto the clean out tray, thereby eliminating this source of water into the bilge.

Cup holders; None of mine were sealed properly when they were installed! This is ESPECIALLY noticeable on the cup holders on the storage pods, when water gets on the top it just trickles down onto whatever is in there. All of the cup holders need to be sealed up. Also, the bow cup holders drain into the bilge, I just plugged mine. So do the transom mounted ones I ran drains from mine as well as the rod holders there to the additional deck drains I put in, if I was to do it over I’d just run them onto the deck.

Rod holders; The forward mounted ones have drains that go overboard but the aft ones drain into the storage compartments. Again, routed these into the additional deck drains but if I were to do it again I’d dump them onto the deck.

Once all these things are done you will have a dry bilge. On occasion I get a half a coffee cup full out of my bilge but that’s usually after I’ve used the raw water wash down extensively and I think it gets in through the removable seat back holes for the jump seats.

Check my signature links for other things I’ve done to my boat. One of the ones I like best is the addition of an electric pump for the raw water wash down and the additional deck drains
 
Last edited:
Thanks for all the advice. I have not used the live well but I don't know if the previous owner did. I did notice last week the boat listing to port though, but the live well itself is and has been dry as far as I know.

I keep the boat on a lift which is similar to having it out on a trailer (the difference being I have to wade into the river to unscrew the hull drain plug). So this morning I went over and got in the water and unscrewed the hull drain plug. At least a gallon of water came out so that was all below the level of the bilge pump.

But when I pulled the drain plug a large chunk of clear silicone popped out. It looked like it had a partial molded shape of a fitting as if it was half the silicone that used to be around a hose or thru-hull fitting. It was good sized like 1" by 1" by 3/8'. So likely there is some thru hull fitting somewhere that is missing half its silicone. I did spray silicone on the drain plug/o-ring and both male & female threads before replacing it.

I did not have anyone around to see if any water I poured into the compartment leaked anywhere so that will be next to try.
Right on… next time out be sure and fill the live well, the boat rides perfectly level with it full..
 
Thanks for all the advice. I have not used the live well but I don't know if the previous owner did. I did notice last week the boat listing to port though, but the live well itself is and has been dry as far as I know.

I keep the boat on a lift which is similar to having it out on a trailer (the difference being I have to wade into the river to unscrew the hull drain plug). So this morning I went over and got in the water and unscrewed the hull drain plug. At least a gallon of water came out so that was all below the level of the bilge pump.

But when I pulled the drain plug a large chunk of clear silicone popped out. It looked like it had a partial molded shape of a fitting as if it was half the silicone that used to be around a hose or thru-hull fitting. It was good sized like 1" by 1" by 3/8'. So likely there is some thru hull fitting somewhere that is missing half its silicone. I did spray silicone on the drain plug/o-ring and both male & female threads before replacing it.

I did not have anyone around to see if any water I poured into the compartment leaked anywhere so that will be next to try.

Unless they use different sealants on the FSH, CLEAR silicone was likely done by the previous owner, to something that sounds like it wasn't addressed properly. If I had to guess, look at your scupper valve (the biggest drain fitting on the transom - you can view it through the cleanout tray area). The two colors of sealant that you should run across is the black sealant (the "afterbirth" is the common one, but that's usually found within the first year-ish) and grey, used for most everything else and to glue the 2 pieces of your boat together. White would be the other typical color, but like I said, it's possible they switched sealants over the years - you still have something to track down.
 
Congratulations 🎉🍾 on the purchase! You’ve bought a great boat and I think you will find it as enjoyable of a boat as I have!

So there’s a few areas where water can be coming in at on your boat. The good news is with some time and a little effort you can achieve a dry bilge.

First, carefully inspect the O ring on the drain plug, as @Babin Farms eluded to, having the boat on the trailer with plug in and add water to the bilge is a great to check for leaks. Pull the bilge pump automatic fuse which is next to the batteries before you start this process so you can add enough water to fully cover the bilge pump without it coming on to increase the head pressure inside the bilge. Spray the plug O ring with silicone spray as well as the female threads to keep things easy to install and remove.

Next, I’m going to assume you’ve had your live well full? If you keep the live well full the boat will list to port.

-If so there’s a couple of places where water can leak from the live well. There is an aerator on your live well, it picks up air from the little black circle with MAX AIR written on it, above the live well on the transom, there is a small black hose that runs from there down to a nipple on the aerator suction side fitting, that’s the one with the microfiche filter screen. I’ve seen a few 210 FSH owners finding the little black hose not connected to this little nipple, and when the live well is full a small but constant flow of water is draining into the bilge. You can pull the transom mounted cup holder on the starboard side and reach down in there to check that it’s connected.

-The next thing to check is the tightness of all the fittings on the live well. You’ll have to pull the clean out tray gain access to a couple of them although you’ll be able to reach the aerator fittings from the aforementioned cup holder. The others will require a certain level of boat yoga to get to from the clean out tray area. These are plastic fittings so just snug on them or you can strip the threads. While the clean out tray is off you can check the live well fill pump and it’s hoses as well as all the other clamps and such for tightness and corrosion.

-The aft bilge area also gives you access to the deck drain scupper and the live well drain scupper, when you’re on the water use a bright light and reach down there to check for leaks around the scuppers and the associated hoses. These scuppers are plastic from the factory and should be changed out with stainless steel fittings.

Check this thread I did on the OEM scupper replacement
OEM scupper replacement

Also

Once you’re done in the aft bilge spray this area down with silicone spray to prevent corrosion and it makes it look nice.

Next will be the anchor locker drain. Once our boats this drain is barely above the water line, if anyone is sitting up front it will be under water, and if the one on your boat is anything like mine it will be bringing water into the bilge. @drewkaree did a great thread on this and the link below picks up with my contributions to that thread. Be sure and get the little stopper to keep water out of the anchor locker once you’ve replaced the crappy OEM thru hull.


Other areas of water intrusion

Back to the clean out tray…. This needs to be sealed after it’s installed, don’t glue it down. You may find that the OEM screws are stripped so get some larger screws and put them in, just snug. I also eliminated the clean out tray drain as our boats have a channel on either side of the clean out tray, and that drain can allow water to shoot up into that area if you stop fast, I got the block off fittings from marine east, this eliminates another possible leak area and it makes it easier to get the clean out tray off and on. Next, you’ll want to get a mechanical hatch riser from Jet Boat Pilot.

Clean out plugs;
I’d also suggest putting clean out plug seal replacement kits on your plugs, then get a few sets of O rings from @Spooky pantz.

Check out this thread. This find by @TeeNGee deserves the Nobel peace prize! This will eliminate water coming up from the clean out plugs and onto the clean out tray, thereby eliminating this source of water into the bilge.

Cup holders; None of mine were sealed properly when they were installed! This is ESPECIALLY noticeable on the cup holders on the storage pods, when water gets on the top it just trickles down onto whatever is in there. All of the cup holders need to be sealed up. Also, the bow cup holders drain into the bilge, I just plugged mine. So do the transom mounted ones I ran drains from mine as well as the rod holders there to the additional deck drains I put in, if I was to do it over I’d just run them onto the deck.

Rod holders; The forward mounted ones have drains that go overboard but the aft ones drain into the storage compartments. Again, routed these into the additional deck drains but if I were to do it again I’d dump them onto the deck.

Once all these things are done you will have a dry bilge. On occasion I get a half a coffee cup full out of my bilge but that’s usually after I’ve used the raw water wash down extensively and I think it gets in through the removable seat back holes for the jump seats.

Check my signature links for other things I’ve done to my boat. One of the ones I like best is the addition of an electric pump for the raw water wash down and the additional deck drains
I'm not sure I want to fill the live well. Sounds like it would be introducing a water intrusion problem that I would have to solve and based on what I'm reading from your post about it there are multiple points to address and I would need a video to get through that. As I read through it was difficult to understand where all those parts are and how to "fix" them.
 
8
I'm not sure I want to fill the live well. Sounds like it would be introducing a water intrusion problem that I would have to solve and based on what I'm reading from your post about it there are multiple points to address and I would need a video to get through that. As I read through it was difficult to understand where all those parts are and how to "fix" them.
Do you have a service manual? If not get one, they’re quite valuable.

Did you read the links I posted?

Here’s the good news, if you haven’t filled the live well it’s not the source of your leak.

Checking the fittings of the live well isn’t that difficult, I’d make you a vid but I’m not taking my boat apart to make one, just check the fittings tightness by trying to gently wiggle them from inside the live well with your fingers. With the boat on the trailer, use a bright light, I suggest a LED Mini Mag light, they’re small and very bright, and look down through the mechanical access hatch on the clean tray to see the inside of the hull drain and look for any water accumulated water sitting in front of the drain plug in the V of the hull, if there is any use a micro fiber towel or a sponge and remove it.

Install the live well drain plug and fill it with water up to the where water starts flowing out of the over flow drain, it’s high up on the starboard side, you should see the over flow drain on the left side when you install the live well drain plug, it’s up high. Then turn on the aerator to manual, if the little black air supply tube is attached you’ll hear a slurping sound from the max air fitting and you’ll see aerated water coming from the aerator discharge in the live well. Use a bright light and look down through the access hatch on the clean tray to see the inside of the hull drain and look for any water accumulating in the V, give this at least 15 mins, if there isn’t any you’re probably good to go on the live well. If you don’t fill the live well when you’re on the water the boat will list to port and want to pull to the right whilst underway.

My bet is your leak is coming from the drain plug O ring being bad, a leak from either the deck drain scupper or the live well drain scupper, the anchor locker drain or a combination thereof.

Before going out next time make sure the hull is dry inside, check it just before launch to make sure some water didn’t show up.

Just order a new hull drain plug and replace the one that’s in the boat now. Be sure and clean the drain hole with a rag once the old plug is out of the way and before you install the new drain plug to make sure the drain plug O ring has a clean surface to seat on. Next time when you first put the boat in the water look down in the V for water coming in, that’s the lowest place on the boat.

In the links I posted for you there are pictures of the deck drain and live well drain scuppers both from inside and outside, next time you put the boat on the water use the bright light to check for these two fittings for a leak, reach down there and feel around to the bottom of these fittings and see if there is any water coming in. When I replaced these two scuppers I didn’t use 5200 sealant and tried to rely on the supplied silicone gasket and it was leaking and I found it by reaching down there and felt it. Lesson learned, Always use copious amounts of 5200 on thru hulls at or under the water line when installing them.

Check your anchor locker drain, if it looks like mine did in the link I posted

IMG_1971.jpeg

IMG_1972.jpeg

and you had people up front whilst sitting still, the anchor locker drain will be under water, and water will be coming in there and filling the anchor locker and that water will go around the outside of the thru hull inside the anchor locker and drain into the bilge. Our boats are three pieces, the hull, the liner and the top cap. The anchor locker is part of the top cap and is separate from the hull.

In this picture you can see how close the anchor locker drain is to the water, maybe an inch with no one in the boat.

IMG_3724.jpeg

When it’s done it’ll look like this.

67623635207__2D2DD146-D691-453B-B486-F750264CFF56.jpeg


IMG_1977.jpeg

IMG_1978.jpeg

IMG_1984.jpeg

IMG_1987.jpeg
IMG_1989.jpeg
IMG_7149.png
 
Last edited:
Latest update. I decided to replace the o-ring on the hull drain plug. Unscrewed the plug and about a gallon of water poured out. Replaced the o-ring, made sure the plug opening was clear and wiped clean, sprayed Yamashield on the plug and opening, replaced the plug. I hand tightened it and gave it about a 1/8 turn with pliers to tighten if further. Lowered the lift so the rear of the boat was submerged and the only scuppers below the water line were the ones for the deck drain and live well (live well is empty and bone dry). No water could enter the anchor locker or seep through behind the rub rail as the boat was stationary on the lift with the stern "dipped" in the water.

After about 40 minutes the bilge was full to the point of the pump turning on. I monitored the deck drain scupper through the rear clean out hatch for drips and it remained totally dry. Not sure about the other scupper back in that area as I don't think I know where it's through hull juncture is (guess I should have figured that out) and will have to rule that out? Is it the live well drain?

The only other thru-hull areas that could be leaking I suppose are the area where the transducer is attached, the speed pickup, or the live well pickup which is totally on the bottom of the boat, literally facing down in the water (not sure how to monitor it for leaks).

When I squirt water into the bilge I don't see water coming out anywhere.

Another item is that in my original post I referenced a clear silicone glob that fell out when I first removed/checked the drain plug. It looks like someone may have smeared clear silicone around the drain plug "frame" i.e. - the actual stainless fitting on the hull that the plug screws into. Maybe it was leaking and they tried to put silicone on the outside and a big glob on the inside? Pure speculation but this is driving me nuts and would really love to have a boat that is not taking on water.
 
On mine, I had a leak coming from the raw water wash down intake line. There is a lever to open/close that line under the inspection hatch and it was leaking when “open”. It took me a while to find it since you can’t open the hatch with the kill switch. But, taped down the switch and was able to inspect all of those lines for leaks and it was just dumping into the bilge. Once I closed it, no more leaks
 
Last edited:
Fill the bilge with water when the hull is dry and look to see where it exits. A leak that big has to show. Fill the water till it touches the bottom of the engines
 
Latest update. I decided to replace the o-ring on the hull drain plug. Unscrewed the plug and about a gallon of water poured out. Replaced the o-ring, made sure the plug opening was clear and wiped clean, sprayed Yamashield on the plug and opening, replaced the plug. I hand tightened it and gave it about a 1/8 turn with pliers to tighten if further.

Using a wrench to tighten the plug is not a good idea
 
In that thread you will see pictures of the two scuppers, deck drain and live well drain.


As @drewkaree suggested, it’s not a good idea to use pliers on the drain plug to tighten it, it should seal just fine with just a slight snugness with your fingers, unless it’s some how compromised. Did you replace this O ring with the Yamaha part? If you did it would have come with a new plug as well.

In the diagram below you can also see how the articulating keel pivot and drain plug mounts to the hull, it’s held on with four bolts and could be removed and re sealed pretty easily. I would bed that piece with enough 3M 4200 so that it squishes out all around the piece and wipe off the excess, let it dry thoroughly per the instructions. I’d normally say to use 3M 5200 but it could be necessary to remove that piece at some point if it got damaged, and 5200 would make that very difficult. The scuppers, when replaced with stainless steel one are a different story, those should be bedded with 5200, same instruction there as with the keel piece, bed with plenty of sealant so that it squishes out everywhere, including under the nut on the inside. When I replaced my scuppers which came with a silicone gasket, I tried relying on that gasket and they leaked, so I had to pull them back out and reseal with 5200= total pain the ass…should have used 5200 in the first place.

IMG_0201.png

Since you have not been using the live well I suggest you turn the sea cock off that is located in the aft starboard corner of the engine bay to eliminate that as a possible source of water. In the diagram below it shows the two sea cocks and their location. See below.

IMG_0202.png

I suggest you remove the clean out tray so can see clearly into the aft bilge and have the best access you can to the two scuppers, trying to see and reach the two scuppers, let alone look for a trail of water with the clean out tray installed is impossible with the tray installed. You will also be able to see and have access to the live well fill pump and its plumbing.

Use a sponge and remove all the water in the V of the hull with a rag or sponge 🧽 before the next test.

Once you lower the boat into the water you’ll need to sit there and watch / feel around the areas with a very bright light, you can clearly see the drain plug in the V of the hull, and at the rate the water is coming in you should see the water start to accumulate very quickly. I’m sure you will find the source of the leak with the clean out tray off.

If, with the live well fill sea cock off you see no water intrusion you will have discovered the source of water and can then turn it on and see where the water is coming from in that system. I’ve yet to see that plumbing be an issue but there’s always a first time.
 
Last edited:
I found the source of the leak. It looks like it’s coming from one of the steering linkages that turns the port side jet terminus left and right.

Now the question is how to fix it. There’s a bunch of clear silicone smeared all around where it comes through the hall on the inside. I suppose I need to get all that silicone off as best I can and pack it with 4200 not sure if something else needs to be tightened or loosened and then re-tightened first.
 

Attachments

  • IMG_7074.jpeg
    IMG_7074.jpeg
    484.8 KB · Views: 11
  • IMG_7073.jpeg
    IMG_7073.jpeg
    606.3 KB · Views: 11
  • IMG_7071.jpeg
    IMG_7071.jpeg
    716.8 KB · Views: 12
I would think you’d need to remove the cable from the transom and clean everything up thoroughly and make sure the area is dry and wipe it down with denatured alcohol.

From the factory it looks like clear silicone, I wouldn’t use 4200 as it is too “permanent”, get some gorilla 🦍 
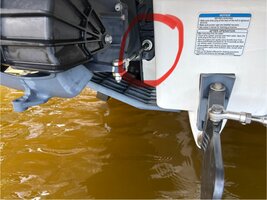
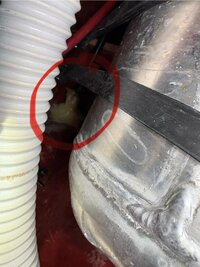
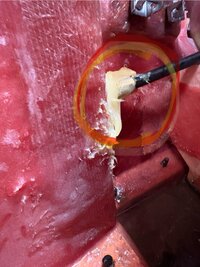
silicone, put a layer of electrical tape around that part of the cable that moves in and out of the sheath to keep the silicone out of the part of the cable that moves, pack the hole with silicone and re install the cable through the transom. Before putting the nut on to secure the cable housing from the outside, pack as much silicone as you can around and into the hole there then put the nut on and tighten it down to the specified torque.

On the inside of the hull in the aft bilge area, make a circular patch of silicone against the fiberglass then build it up around the cable and let it dry. Very important to make sure everything is super clean by wiping down with denatured alcohol. This is how mine looks from the factory. I have not replaced my steering cables before, but, in your pictures it looks like there isn’t a very good amount for silicone and its obviously not sealing the way it should.. perhaps the previous owner replaced the steering cables and didn’t seal it up good enough.

The screen shot below is from my service manual and no where does it talk about applying silicone like we see was done at the factory..

IMG_0204.jpeg

IMG_0206.jpeg

Several members here have replaced steering cables and I’m sure they have experienced knowledge on this. Going to tag a few peeps to see what they think.

@lazergeek
@HangOutdoors
@Liveto99
@Neutron
@Bugslayer
@VitaminSea

Used the site search engine and found this thread.,

 
About the best pic I could get from the mechanical hatch. You can see the nice pyramid of silicone from the hull up onto the cable.

IMG_8837.jpeg
 
Back
Top